Introduction
This guide assumes you are setting up a forger node on EON mainnet. If you would like to set up a forger on Gobi testnet, replace all EON with Gobi in these instructions.
Requirements
The recent submission of ZenIP 42206 states that rewards currently paid to Secure Nodes in the Horizen mainchain block will be redirected to an EON Forger Subsidy Fund. Thus, any node assigned as a Forger Node in the EON ecosystem must have the configuration requirements listed in the EON Forger Node Criteria. The EON Forger Node requirements can be implemented by users or blockchain providers.
Additional Information
- Read the Horizen Blog that explains the need for a secure EON ecosystem.
- View the Beyond Horizen episode on Redirecting Secure Node Rewards to EON.
EON Forger Node Criteria
Minimum and recommended instance requirements for running an EON Forger Node in the context of Open Forging.
| Requirement | Minimum | Recommended | Notes |
|---|---|---|---|
| CPU Core count | 4 | 8 | |
| Frequency/IPC | 2.5 GHz | 3.0+ GHz | High frequency is required in order to scale better. |
| Memory | 16 GB | 32 GB | |
| Swap | - | - | Swap is not recommended. |
| Storage | 64 GB | 512 GB | |
| Storage growth | TBD | TBD | Expected growth over time. |
| IOPS | 5000 | NVMe SSD | |
| Bandwidth | 250 Megabit | 500+ Megabit | Low latency connectivity to other Forger Nodes is crucial. |
| IP Address | IPv4 dedicated | IPv4 dedicated |
Network
- EON is available for inbound connections on IPv4.
- Correct reachable address and port combination are advertised to the network by EON.
- Must not restrict peer connections.
- Must configure the EON P2P TCP port 9084 to be reachable from the outside for other nodes to connect to (EON MUST accept incoming connections from other nodes).
Minimum ZEN Stake
- A minimum amount of 10 ZEN in stake (summing all the delegations) is required for forgers to be eligible to propose a block.
Note: The requirements detailed can be added to or modified without notice.
Docker Setup
Perform system update
## Update and upgrade system
sudo apt-get update && sudo apt-get dist-upgrade -y
Install docker
## Uninstall old versions of docker and any unofficial conflicting packages that may interfere with the forger node setup
for pkg in docker* podman-docker* containerd* runc*; do
    sudo apt-get purge $pkg -y
done

## Add Docker's official GPG key:
sudo apt-get update
sudo apt-get install ca-certificates curl -y
sudo install -m 0755 -d /etc/apt/keyrings
sudo curl -fsSL https://download.docker.com/linux/ubuntu/gpg -o /etc/apt/keyrings/docker.asc
sudo chmod a+r /etc/apt/keyrings/docker.asc

## Add the repository to APT sources:
echo \ "deb [arch=$(dpkg --print-architecture) signed-by=/etc/apt/keyrings/docker.asc] https://download.docker.com/linux/ubuntu \ $(. /etc/os-release && echo "$VERSION_CODENAME") stable" | \ sudo tee /etc/apt/sources.list.d/docker.list > /dev/null


## Install Docker’s official packages and required dependencies
sudo apt-get update
sudo apt-get install docker-ce docker-ce-cli containerd.io docker-buildx-plugin docker-compose-plugin -y
Test the installation
## Add current logged in user to Docker group
sudo usermod -aG docker "$USER"

## Set temporal Docker group to 'user'
newgrp docker


## Verify that Docker Compose is installed correctly
docker compose version

## Run the test docker's container
sudo docker run hello-world

## Expected Output:

Unable to find image 'hello-world:latest' locally
latest: Pulling from library/hello-world
c1ec31eb5944: Pull complete
Digest: sha256:6352af1ab4ba4b138648f8ee88e63331aae519946d3b67dae50c313c6fc8200f
Status: Downloaded newer image for hello-world:latest
Hello from Docker!
This message shows that your installation appears to be working correctly.
Run a Forger Node
Download the official EON forger node repository from GitHub
## Install required packages and necessary dependencies for forger node setup
sudo apt-get update
sudo apt-get install git jq pwgen aria2 -y

## Download the eon forger node repository using Git
cd ~ && mkdir eon-forger-node && cd ~/eon-forger-node
git clone https://github.com/HorizenOfficial/compose-evm-simplified.git

## Navigate to the downloaded repository
cd compose-evm-simplified

## Run the init.sh script to initialize the deployment
./scripts/init.sh
Select 2 for forger and press Enter.
=== Checking all the requirements ===

What kind of node type would you like to run:
1) rpc
2) forger
#?
Select 1 for EON and press Enter.
What network would you like to setup 'eon' (mainnet) or 'gobi' (testnet):
1) eon
2) gobi
#?
For this next step, it’s suggested that a new wallet seed phrase be set up rather than using an existing one. For users who have previously set up a forger node and prefer to import their existing seed phrase, you may do so by typing yes followed by Enter.
Type no and press Enter
=== Setting up the wallet seed phrase ===

Do you want to import an already existing seed phrase for your wallet ? ('yes' or 'no')
Save your seed phrase in a secured password vault or cold storage. This seed phrase will be used in a later step for staking.
Type yes and press Enter to confirm the saving of your seed phrase
For the next two questions it is suggested to type no and press Enter (unless you know what you are doing).
=== Setting up the docker containers local user and group ids ===

The uid:gid with which to run the processes inside of the container will default to 0:993
Do you want to change the user (please answer 'no' if you don't know what you are doing) ? ('yes' or 'no')

=== Setting up the docker volumes datadir ===

By default internal docker volumes will be used.
Do you want to change the datadir (please answer 'no' if you don't know what you are doing) ? ('yes' or 'no')

# Expected Output:
=== Project has been initialized correctly for forger and eon ===

=== RUNNING FORGER NODE ===

1. First, run the zend node:

docker compose -f /home/user/compose-evm-simplified/deployments/forger/eon/docker-compose.yml up -d zend

Before moving onto step 2) below you may want to set up a seed to speed up the sync process. See section below on creating a seed before moving to the next step.

2. Verify your node's block height matches against the public explorer: https://explorer.horizen.io:

docker compose -f /home/user/compose-evm-simplified/deployments/forger/eon/docker-compose.yml exec zend gosu user zen-cli getblockcount

3. Once the zend node is fully synced, start the evmapp node:

docker compose -f /home/user/compose-evm-simplified/deployments/forger/eon/docker-compose.yml up -d

4. Verify your evmapp node's block height matches against the public explorer:


If EON mainnet use the following: https://eon-explorer.horizenlabs.io
If Gobi testnet use the following: https://gobi-explorer.horizenlabs.io

===========================
As the previous output says, we need to run the Zend node first and wait until it gets synced. To speed up the process, a seed is suggested.
Speed up Zend Sync Process with a Seed
An EON forger node requires a Zend node to be running as well. Syncing a Zend node from scratch may take a few hours, so a seed file can speed up the process.
Run the following command to download and extract the seed file.
## Download the seed file (this process may take a while depending on the speed of your internet service provider)
./deployments/forger/eon/scripts/download_seed.sh
Run Zend node
## Start the Zend node
docker compose -f deployments/forger/eon/docker-compose.yml up -d zend

## Expected Output:
[+] Running 8/8
✔ zend 7 layers [⣿⣿⣿⣿⣿⣿⣿]      0B/0B      Pulled                      9.4s
  ✔ 8ee087424735 Pull complete                                         0.5s
  ✔ 09d412f48297 Pull complete                                         0.5s
  ✔ 3fafa6457432 Pull complete                                         0.7s
  ✔ 17f8b2f48137 Pull complete                                         1.0s
  ✔ 134ac7ffa7cc Pull complete                                         0.9s
  ✔ 6c225e875ca2 Pull complete                                         1.2s
  ✔ 2b88cc91a068 Pull complete                                         3.7s
[+] Running 1/7
⠋ Network evmapp-mainnet-eon_evmapp_network      Created               0.9s
⠏ Network evmapp-mainnet-eon_inet                Created               0.8s
⠇ Volume "evmapp-mainnet-eon_evmapp-data"        Created               0.8s
⠇ Volume "evmapp-mainnet-eon_evmapp-snark-keys"  Create...             0.7s
⠇ Volume "evmapp-mainnet-eon_zcash-params"       Created               0.7s
⠇ Volume "evmapp-mainnet-eon_zen-data"           Created               0.7s
✔ Container zend                                 Started

## Check to see if zend container is running
docker ps

## Check to see if you’re running the latest version of zend
docker exec zend gosu user zen-cli getinfo | grep version
To verify that you’re running the latest version of Zend, you may visit https://github.com/HorizenOfficial/zen/releases/latest. The output shown from running the previous command should match the version shown on the Zend latest releases page.
## Get current block height and verify if zend node is fully synced
docker compose -f deployments/forger/eon/docker-compose.yml exec zend gosu user zen-cli getblockcount
After this you will need to wait until your Zend node is fully synced with the most current block. You can check the Mainchain current block here: https://explorer.horizen.io/. For Gobi testnet check here: https://explorer-testnet.horizen.io/.
If the output number shown from running the previous command does not match the height number shown from the latest block on the Horizen Explorer page, continue to run the previous command until both numbers match.
Continue verifying that the node is running by checking the sync status using the previous command (this may take some time).
✅ Your Zend node will be fully synced when it reaches the last block height shown in the Horizen Explorer Page. Once this occurs, you may proceed to the next step of running your EVMAPP node.
Run EVMAPP node
Run the following command to start and run the evmapp node.
## Run evmapp node
docker compose -f deployments/forger/eon/docker-compose.yml up -d

## Expected Output:
[+] Running 11/11
✔ evmapp 10 layers [⣿⣿⣿⣿⣿⣿⣿⣿⣿⣿]      0B/0B      Pulled                  6.6s
 ✔ 63e9bbe32327 Pull complete                                             0.5s
  ✔ 7a4f4ee58f0a Pull complete                                            0.4s
  ✔ bdab001b72db Pull complete                                            0.6s
  ✔ 7d2b4d8b8e2f Pull complete                                            0.6s
  ✔ 6fc75f2a9c3d Pull complete                                            0.7s
  ✔ 8e421af2e68b Pull complete                                            0.9s
  ✔ 2ab5516e4a8f Pull complete                                            0.9s
  ✔ 6ae3b5422e0b Pull complete                                            3.3s
  ✔ 4ce997cc9690 Pull complete                                            1.3s
  ✔ 0672c782fcf6 Pull complete                                            1.8s
[+] Running 2/2
✔ Container zend    Running                                               0.0s
✔ Container evmapp  Started

## Check to see if evmapp container is running
docker ps

## Check to see if you’re running the latest version of evmapp
docker exec evmapp gosu user curl -X POST "http://127.0.0.1:9545/node/info" -H "accept: application/json" | grep nodeVersion
To verify that you’re running the latest version of EVMAPP, you may visit https://github.com/HorizenOfficial/compose-evm-simplified/releases/latest. The output shown when running the previous command should match the version shown on the EVMAPP latest releases page.
## Get current block height and verify if evmapp node is fully synced
docker compose -f deployments/forger/eon/docker-compose.yml exec evmapp gosu user curl -sX POST "http://127.0.0.1:9545/block/best" -H "accept: application/json" | jq '.result.height'
After this, you will need to wait until your EVMAPP node is fully synced with EON’s most current block. You can check the EON Mainchain current block here: https://eon-explorer.horizenlabs.io/. For Gobi testnet check here: https://gobi-explorer.horizenlabs.io/.
If the output number shown when running the previous command does not match the height number shown from the latest block on the EON Explorer page, you may continue to run the previous command until both numbers match.
Continue verifying that the node is running by checking the sync status (this may take some time).
✅ Your EVMAPP node will be fully synced when it reaches the last block height shown on the EON Explorer Page. Once this occurs, you may proceed to the next step of generating keys for your forger node.
Generate Keys
Once the EVMAPP node is fully synced, the next step is to generate keys for your forger node.
Run the following command to generate keys for your forger node.
## Generate forger keys
./scripts/forger/generate_keys.sh

## Expected Output:
 Generated VRF Key Pair.
 VRF Public Key         : ...
 VRF Private Key        : ...

 Generated Block Sign Key Pair.
 Block Sign Public Key  : ...
 Block Sign Private Key : ...

 Generated Ethereum Address Key Pair.
 Ethereum Address                    : ...
 Ethereum Private Key                : ...
 Ethereum Private Key for MetaMask  : …
You will see values for each of the keys and addresses above. Copy the entire output shown from the previous command and store it in a password vault or a secured password manager. If you prefer not to, please save these keys in a safe place as they will be used for staking $ZEN to your forger in a later step.
You may verify that the keys were generated correctly by running the following command:
## Verify that the keys were generated correctly
docker compose -f deployments/forger/eon/docker-compose.yml exec evmapp gosu user bash -c 'curl -sXPOST "http://127.0.0.1:${SCNODE_REST_PORT}/wallet/allPublicKeys" -H "accept: application/json" -H "Content-Type: application/json"'

## Compare the returned public key with yours.

## Expected Output:
{
 "result" : {
   "propositions" : [ {
     "publicKey" : ...
   }, {
     "publicKey" : " ...
   }, {
     "address" : ...
   } ]
 }
}
You should see the same values you’ve saved from the previous step in the output above.
(Optional) Reward smart contract deployment
Starting from EON 1.4 you can redirect part of the forger's rewards to a smart contract, typically to use it to handle rewards distribution to delegators (but you can implement any workflow you want).
The redirection will be specified with two parameters (rewardShare and rewardAddress) set during the forger registration step, described in the next point of this guide.
(Note: this step is not needed if in the following forger registration step you specify rewardShare = 0, meaning you don't want to split the rewards and send all of them to the forger)
You can use any smart contract, but Horizen provides an audited and certified smart contract with a default implementation: it is able to collect the rewards, and exposes a "claim" function that each delegator can call to retrieve the money.
You can check the smart contract code here: https://github.com/HorizenOfficial/eon-delegated-staking.
More info on the methods exposed can also be found in the README file here.
A new instance of the smart contract is required for each forger: if you want to deploy one for your forger, the factory is available at this address: 0x8604Bb903B7D54F666bA1e75f98045345C63132a
You can call the method deployDelegatedStakingReferenceImplementation of the factory, parameters required are the signPubKey and vrfKey that identify your forger (the latter is split in two different parameters: one for the first 32 bytes and one for the last byte).
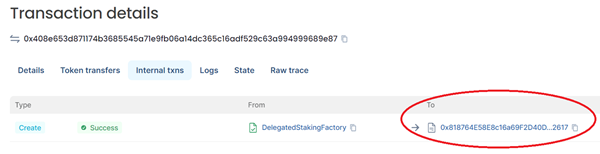
The method execution will trigger the deployment of the smart contract instance: once executed, you shuld see in the transaction log the new smart contract created. You can also see it in the explorer: check the transaction detail page, then click the tab "Internal txns"; you should see a "Create" transaction from the factory contract. The destination is the address of your newly created contract.
Take note of this address: you will need it in the following step.
Forger registration
Starting from EON 1.4, a forger on-chain registration is required before being able to accept delegations and forge blocks. You can launch the transaction using the http endpoint /transaction/registerForger in your local node. The mandatory parameters are:
- blockSignPubKey and vrfPubKey: use the keys generated in the previous 'Generate keys' point
- stakedAmount: the initial stake you want to assign to your forger. Represented as an integer value specified in zennies, and must be >= 10 ZEN. The amount will be taken from your local node wallet, and you will be able to withdraw it any time using the same address used by sending this transaction (but keep in mind that if the total delegated amount will become < 10 ZEN, your forger will no more be able to propose blocks).
- rewardShare: Reward to be redirected to rewardAddress (integer, range from 0 to 1000 - where 1000 represents 100%)
- rewardAddress: External reward address (may be a single EOA or (more likely) a smart contract handling rewards distribution to delegator - see previous point). Must be present only if rewardShare is > 0. Omit the initial 0x prefix when specifying it.
Important:
Double check rewardShare and rewardAddress parameters before launching the transaction, since they will not be updatable once set! If you want to change them after the registration,
you will have to register a new forger with different keys, and move all the delegations to the new forger.
Check the /transaction/registerForger EON documentation page for further info on this endpoint.
Existing forgers present before EON 1.4 will not have to perform this step, and will be registered by default, with rewardShare = 0.
Stake $ZEN to your Forger
Prerequisites
In order to stake $ZEN to a forger node, you first need to send your preferred staking amount of $ZEN to a wallet that supports the EON network. In this guide, we will be using MetaMask wallet.
- Create a MetaMask wallet
- Add EON network to your wallet dApp.
- This guide assumes you are using MetaMask dApp as your wallet of choice. Use the following guide to connect the EON network to your MetaMask wallet: https://docs.horizen.io/horizen_eon/connect/connect_your_wallet.
- Forward transfer (send) $ZEN to your MetaMask wallet.
- Please use the following guide to forward transfer $ZEN to that wallet address: https://docs.horizen.io/horizen_eon/connect/forward_transfer.
Staking
In this guide, we will walk you through the process of staking $ZEN to your forger node by using Web Remix IDE. For more information about Remix IDE, see the following documentation: https://docs.horizen.io/horizen_eon/develop_and_deploy_smart_contracts/remix.
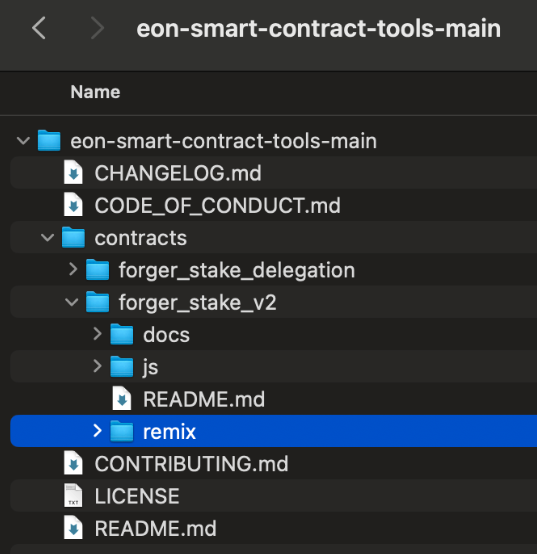
In order to use Web Remix IDE to set up staking for your forger node, you first need to download the eon-smart-contract-tools-main zip folder containing a suite of scripts that will help to automate the setup process and extract the files within the zip folder. Please note the drive location where this folder is downloaded, as you will need to upload files from this folder at a later step.
Before proceeding, make sure to extract the files from the downloaded zip folder and note the location of the extracted files. Also, please make sure to sign in to your MetaMask web wallet account before continuing your Remix IDE setup.
For more advanced users who wish to download the repository containing the suite of scripts needed to automate the setup process, you may use Git to do so:
## Clone the smart contracts tools
git clone https://github.com/HorizenOfficial/eon-smart-contract-tools
Using these tools will enable you to stake and unstake your $ZEN to an EON forger node.
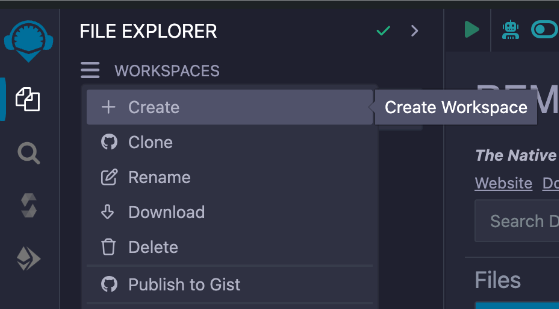
First, open Web Remix IDE
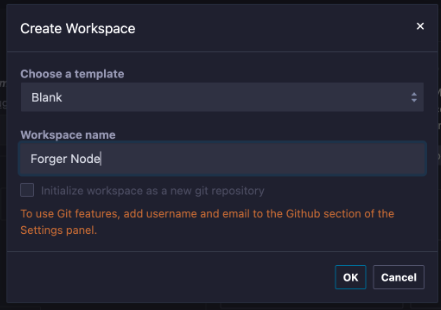
Next, click on the 3 horizontal lines to the left of Workspaces and select Create. This will prompt you to create a new workspace. Name the workspace “Forger Node,” as shown below, and click OK.
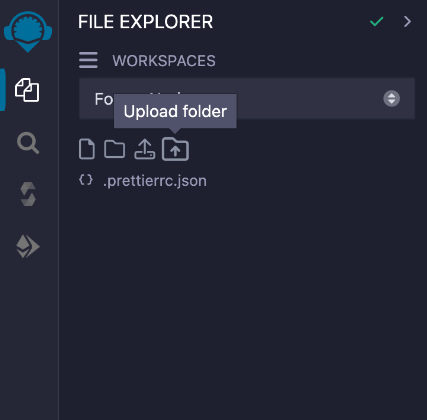
Import the Remix folder scripts. To do this:
- Click the Upload Folder icon as shown below and find the folder location containing the extracted files from your downloaded zip folder (the noted download location from the previous steps above).
- Select the remix folder, which can be found under eon-smart-contract-tools-main/contracts/forger_stake/remix, and click upload.
Before continuing, please have the key-value pairs that were created in the Generate Keys step ready and available to use. These values will be used in the next step.
- From the remix folder, select the delegate.js file in the explorer window. Locate the section to the right and look for lines 9, 10, & 11. Fill in the following required fields:
- AMOUNT
- This is the amount you’d like to stake (make sure you have this amount in your MetaMask wallet).
- YOUR_BLOCK_SIGN_PUBKEY
- YOUR_VRF_PUBKEY
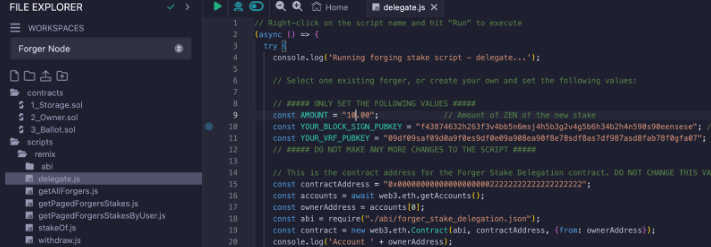
(Make sure to use double quotations around the input values. The values shown in the above screenshot are an example of how your values should be input)
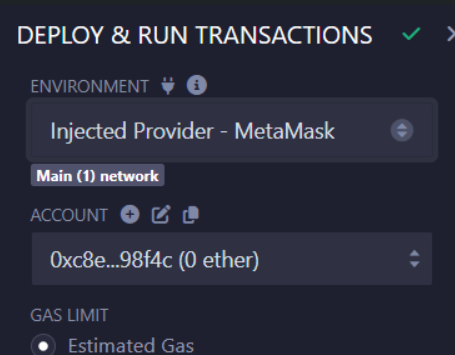
- Go to the Deploy & Run Transactions located in the left window pane of the explorer menu. Under ENVIRONMENT select Injected Provider — MetaMask.
- You may be prompted to Connect with MetaMask, assuming this is your first time connecting your web wallet. Check the box to allow the connection, click Next, and then Confirm.
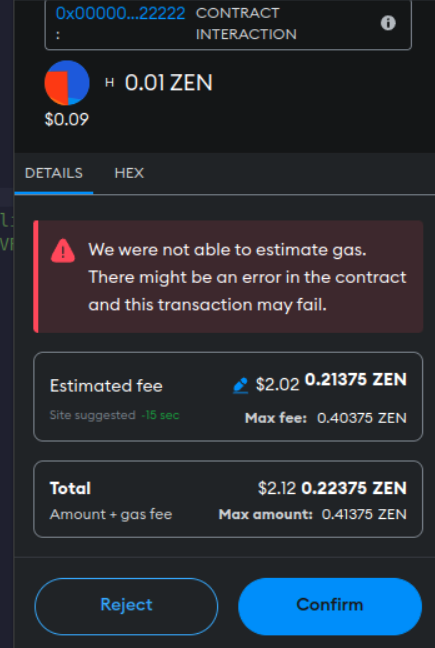
Go back to the file explorer section. Select the open delegate.js file, right-click on it, and select Run.

Accept the transaction on MetaMask by clicking I want to proceed anyway and then Confirm. (make sure you have enough $ZEN left over to pay for gas). Wait until the logs say that the transaction was completed in the Remix log section.

Check your staking on the Explorer.
- Go to the Forger Stake Contract Read Functions page.
- Click on the Connect wallet button.
- Connect your wallet.
- Go to the getPagedForgersStakesByDelegator method and enter the following:
- MetaMask address
- 0 for the startIndex field
- 10 in the pageSize field
- Then click on Query
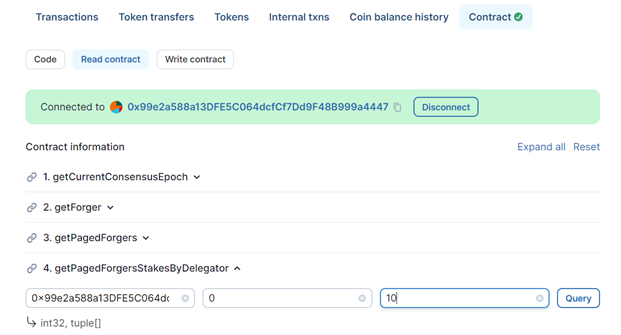
This will get your stakes info such as forger pubkey, vrfkey and amount of $ZEN staked.
Remember that each modification of the stakes will take effect after 2 consensus epochs (25 hours max) in order to be eligible to participate in the block validating process.
Unstaking
- Open Remix and select the withdraw.js file for editing
- Update the AMOUNT , YOUR_BLOCK_SIGN_PUBKEY and YOUR_VRF_PUBKEY fields with the correct values (you can also withdraw a partial amount)
- Run the script.
If you would like to send funds back to the Horizen mainchain please use the following guide to do a backwards transfer.
Monitor Your Validated Blocks
Go to the EON Explorer. Locate the Ethereum-generated address that was issued to you earlier during the Generate Keys step (these keys should always be stored in a secure location. Enter your Ethereum address in the search bar at the top right of the Explorer page and press enter.

All $ZEN earned by validated blocks will be sent to this address (except a rewardShare > 0 was set during forger registration, see Forger registration section), so keep this and the private key in a safe place.
Please look at the FAQ section to learn more or engage with the community on the Horizen discord server.